Overview
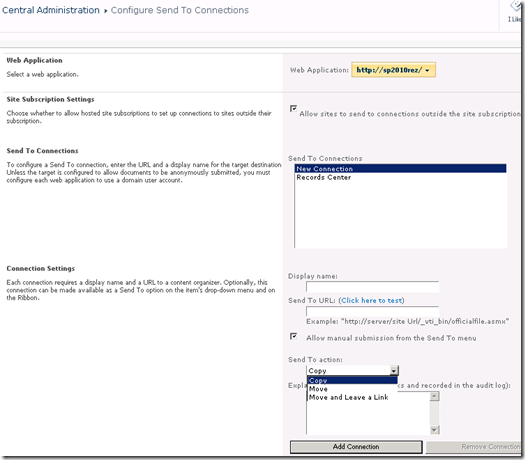
“Send to” ECB (edit control block or dropdown) menu option can be customized to send documents to multiple records management centers, not just one like SharePoint 2007.
It can now do more than just copy a document (like in SharePoint 2007), it can now:
- Move the document
- Copy the document
- Move the document and leave a link to it so it is still accessible from original library
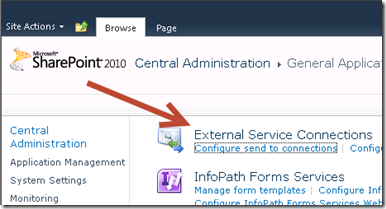
It’s configured in Central Admin –> General Application settings –> Configure Send to Connections:
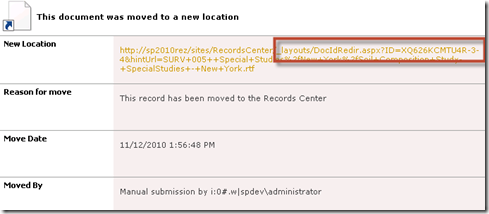
When the “Send to” connection is configured to “move and leave a link”, the document appears with a short-cut symbol to it and points to a page with a special short-cut URL directly to where the document ended up. Every document in the Records Center will have a Document ID with it and this document ID URL has the ability to follow the document to it’s final destination. It has a Document ID associated with it and it points to a URL like: “/_layouts/DocIdRedir.aspx?ID=XQ626KCMTU4R” where the Document ID is XQ626KCMTU4R.
The document itself, gets replaced with a web page of aspx format that is the same as the document name, except that it is with the aspx extension. When you click on the link, you get a page that indicates the document has been moved along with the explanation you fill in during the Send To Connection setup along with the new document id url:
To be able to use the Send To connection, you need to point to a site that has the Content Organizer feature activated. Again, this is different from SharePoint 2007, where it was only available in your one Records Center. You can activate the Content Organizer on any type of site.
Once the content organizer is activated, it creates the ability to connect to the OfficialFile Web Service. This web service needs to be pointed to during the initial Send To connection configuration. To get the URL for the OfficialFile Web Service go to your Records Center (or the site where you have the content organizer activated):
1. In Site Actions –> Site Settings.
2. Click Content Organizer Settings link in Site Administration section
3. At the bottom of page, in Submission Points section, find the URL for the official file web service
4. In the Central Admin Send to connections, us the URL specified. (i.e. http://yoururl/sites/records/_vti_bin/officialfile.asmx)
The complete list of this series can be seen by the following links:
1. Introduction
2. Document IDs
3. Managed Metadata Service (Term Store)
4. In-Place Records Declarations
5. Site Collection Auditing
6. Content Organizer
7. Compliance Details
8. Hold and eDiscovery
9. Content Type Publishing Hubs
10. Multi-Level Retention
11. Virtual folders and metadata based navigation
12. Scaling
13. Send To…
14. Document Sets


